
Inboxes are crowded. A real card in someone’s mailbox isn’t. With Mail a card, we print your video’s thumbnail, a QR code to your watch page, and your personal note on a card, then mail it to your contact for you. When they scan the code, they land on your branded watch page and start watching, and you see it happen.
You pick the card, write the note (printed, or handwritten by our team), and choose the address. We print it, stamp it and put it in the mail. It’s paid from your account’s mail balance, so there’s nothing to set up per order.
Before you start #
- Your account needs a return address. An owner or manager adds it once in Settings → Mailed cards. If it’s missing, the card panel tells you and links straight there. See Set up mailed cards for your team.
- Your mail balance needs to cover the card. Business and Premium plans include an amount each month; anyone can add balance in My Account. See Your mail balance.
- A card goes to one person. Cards mail to addresses in the United States for now.
Step 1 — Choose who the card is for #
- Click New Video and choose Send to a contact.
- Search for the person and click Continue. If they aren’t a contact yet, use + Add a new contact.
- Record or upload your video as usual.
The contact doesn’t need an email address. If they don’t have one, you’ll be told you can still send them a card.
Success check: You reach the send step with the contact already filled in.
Step 2 — Open Mail a card #
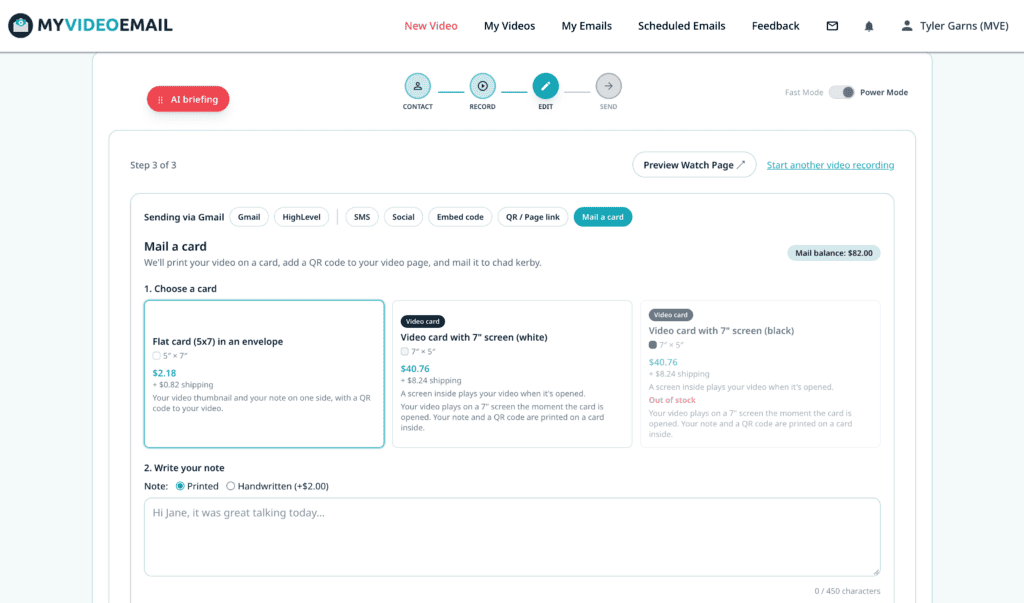
- At the send step, click Mail a card in the row of delivery options (next to SMS, Social, Embed code and QR / Page link).
- The Mail a card panel opens. Your current mail balance shows at the top.
You can also mail a card for a video you’ve already sent: in My Emails, find an email sent to one person and click Mail a card on its row. The card follows up that email, using the same video.
Step 3 — Choose a card #
- Under 1. Choose a card, pick a card. Each tile shows its size, its price, and whether postage is included.
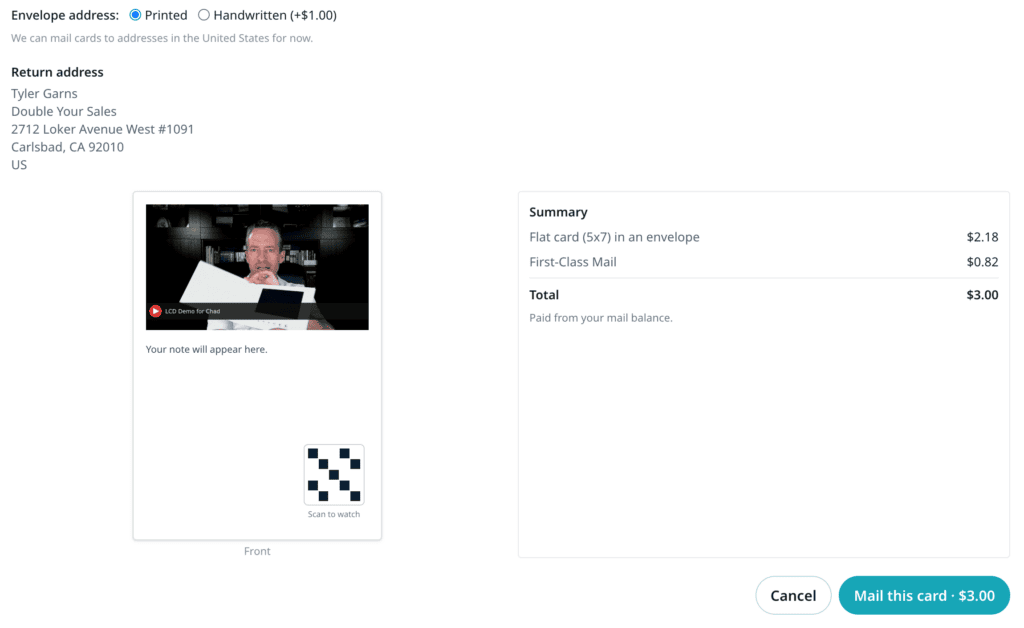
- The preview updates as you go. Click Front, Back or Inside to see each side.
If your account has its own card designs in stock, they appear here marked Your design. See Order custom card designs.
Step 4 — Write your note #
- Under 2. Write your note, type a short, personal message. The counter shows how much room the card has.
- Next to Note:, choose Printed or Handwritten. Handwritten costs a little more; our team writes it by hand.
- Next to Envelope address:, choose printed or handwritten the same way (for cards that come in an envelope).
Tip: A handwritten note and envelope get opened. If this is a prospect you really want to reach, it’s worth it.
Step 5 — Confirm the address #
- Under 3. Where should we mail it?, we show any addresses we already have for this contact: from your connected CRM, or saved by your team in coReel.
- Pick one, or click Use a different address to type a new one. To change a saved address, click Edit.
- Click Check address to confirm it’s deliverable. If the postal service suggests a correction, click Use this address to accept it.
- Leave Save this address to [your CRM] checked to write the new address back to the contact’s record. If you don’t have a CRM connected, Save this address for my team keeps it in coReel instead, where everyone on your team who mails cards can use it.
Step 6 — Review and mail it #
- The Summary lists the card, any handwriting, postage, sales tax and the Total.
- Underneath, it tells you how the card is paid: from your plan’s included amount, your mail balance, or both.
- Click Mail this card.
Success check: You see “Your card is on its way to our team” with an order number. We email you again when the card is in the mail.
Tips and best practices #
- Send the email too. A card works best as a second touch: email the video today, and the card arrives a few days later with the same face and the same message.
- Keep the note short and specific. Mention something from your last conversation. The video does the heavy lifting.
- Set up a scan automation. A QR scan can tag the contact or start a workflow in your CRM. See Track mailed cards and automate follow-up.
- Want the video itself in their hands? A video card plays it on a built-in screen the moment it’s opened. See Send a video card with a built-in screen.
Troubleshooting #
I don’t see Mail a card. Cards go to one person at a time. If you chose a tag, list or more than one recipient, the option is hidden. Choose a single contact. If you still don’t see it, your account owner may not have turned on mailed cards for your role.
It says my account needs a return address. An owner or manager needs to add one in Settings → Mailed cards. If that’s you, click Open settings in the panel.
It says my mail balance is too low. The panel shows how much more the card needs. Owners and managers can add balance in My Account, or turn on auto-reload. Users can ask their account owner.
It says the postal service doesn’t recognize the address. Check the street, unit and ZIP. If you’re sure it’s right (a new building, for example), tick I’ve checked this address. Mail the card anyway.
The price changed while I was ordering. Prices and tax are confirmed when you place the order. If anything changed, the panel shows the new total so you can review it before mailing.
Can I mail a card outside the United States? Not yet. Cards mail to US addresses for now.


